# 第三章 初识 Vue3.0: 新特性详解
Vue3 的文档地址: https://v3.vuejs.org/
# 配置 vue3 开发环境
// 安装或者升级
npm install -g @vue/cli
# OR
yarn global add @vue/cli

// 保证 vue cli 版本在 4.5.0 以上
vue --version

// 创建项目
vue create my-project
然后的步骤
- Please pick a preset - 选择 Manually select features
- Check the features needed for your project - 多选择上 TypeScript,特别注意点空格是选择,点回车是下一步
- Choose a version of Vue.js that you want to start the project with - 选择 3.x (Preview)
- Use class-style component syntax - 输入 n,回车
- Use Babel alongside TypeScript - 输入n,回车
- Pick a linter / formatter config - 直接回车
- Pick additional lint features - 直接回车
- Where do you prefer placing config for Babel, ESLint, etc.? - 直接回车
- Save this as a preset for future projects? - 输入n,回车
启动图形化界面创建
vue ui
# 使用 Vite 创建项目
npm create vite@latest

# Project name: 输入项目名称
# Select a framework: vue
# Select a variant: vue-ts

cd project-name
npm install
npm run dev
# 打开 http://localhost:3000
# 项目结构和插件
推荐给大家安装的插件
如果 eslint 不生效,可以在根目录创建 .vscode 文件夹,然后在文件夹中创建 settings.json 然后输入
{
  "eslint.validate": [
    "typescript"
  ]
}
# 使用 ESLint 规范代码
规范的代码格式可以让整个工作的效率在一定程度上提升到最高
# 没有规范可能出现的问题
- 代码难以读懂
- 代码提交的时候会有很多格式问题的修改,造成不必要的时间消耗。
# ESLint 是什么?
是一个开源的 JavaScript 的 linting 工具,使用 espree 将 JavaScript 代码解析成抽象语法树 (AST),然后通过AST 来分析我们代码。
# 命令行工具
npx eslint --version
npx eslint --ext ts,vue src/**
# Rules
一个 rule 有三个等级 0, 代表关闭,1代表 warning,输出警告,但是不是错误,2 代表错误,会直接抛出错误。这三个数字也可以使用单词来代表,分别是 off warn 和 error。
rules: {
	'semi': 2
}
# Extends
一系列的规则作为一组。大家可以把这一组拿来用到自己的项目中,那么这个就是 extends 字段,是一个数组,里面是几个项目,其实在 extends 中的每一个字段,都是一组规则。
# Ref 语法
<template>
  <h1>{{count}}</h1>
  <h1>{{double}}</h1>
  <button @click="increase">+1</button>
</template>

import { ref } from "vue"

setup() {
  // ref 是一个函数,它接受一个参数,返回的就是一个神奇的 响应式对象 。我们初始化的这个 0 作为参数包裹到这个对象中去,在未来可以检测到改变并作出对应的相应。
  const count = ref(0)
  const double = computed(() => {
    return count.value * 2
  })
  const increase = () => {
    count.value++
  }
  return {
    count,
    increase,
    double
  }
}
# Reactive 函数
import { ref, computed, reactive, toRefs } from 'vue'

interface DataProps {
  count: number;
  double: number;
  increase: () => void;
}

setup() {
  const data: DataProps  = reactive({
    count: 0,
    increase: () => { data.count++},
    double: computed(() => data.count * 2)
  })
  const refData = toRefs(data)
  return {
    ...refData
  }
}
使用 ref 还是 reactive 可以选择这样的准则
- 第一,就像刚才的原生 javascript 的代码一样,像你平常写普通的 js 代码选择原始类型和对象类型一样来选择是使用 ref 还是 reactive。
- 第二,所有场景都使用 reactive,但是要记得使用 toRefs 保证 reactive 对象属性保持响应性。
# Vue3 生命周期
在 setup 中使用的 hook 名称和原来生命周期的对应关系
- beforeCreate -> 不需要
- created -> 不需要
- beforeMount -> onBeforeMount
- mounted -> onMounted
- beforeUpdate -> onBeforeUpdate
- updated -> onUpdated
- beforeUnmount -> onBeforeUnmount
- unmounted -> onUnmounted
- errorCaptured -> onErrorCaptured
- renderTracked -> onRenderTracked
- renderTriggered -> onRenderTriggered
setup() {
  onMounted(() => {
    console.log('mounted')
  })
  onUpdated(() => {
    console.log('updated')
  })
  onRenderTriggered((event) => {
    console.log(event)
  })
}
# 侦测变化 - watch
// watch 简单应用
watch(data, () => {
  document.title = 'updated ' + data.count
})
// watch 的两个参数,代表新的值和旧的值
watch(refData.count, (newValue, oldValue) => {
  console.log('old', oldValue)
  console.log('new', newValue)
  document.title = 'updated ' + data.count
})

// watch 多个值,返回的也是多个值的数组
watch([greetings, data], (newValue, oldValue) => {
  console.log('old', oldValue)
  console.log('new', newValue)
  document.title = 'updated' + greetings.value + data.count
})

// 使用 getter 的写法 watch reactive 对象中的一项
watch([greetings, () => data.count], (newValue, oldValue) => {
  console.log('old', oldValue)
  console.log('new', newValue)
  document.title = 'updated' + greetings.value + data.count
})
# 模块化开发 第一部分 鼠标追踪器
// 在单组件内添加对应逻辑
const x = ref(0)
const y = ref(0)
const updateMouse = (e: MouseEvent) => {
  x.value = e.pageX
  y.value = e.pageY
}
onMounted(() => {
  document.addEventListener('click', updateMouse)
})
onUnmounted(() => {
  document.removeEventListener('click', updateMouse)
})

// 将组件内逻辑抽象成可复用的函数
function useMouseTracker() {
  // const positions = reactive<MousePostion>({
  //   x: 0,
  //   y: 0
  // })
  const x = ref(0)
  const y = ref(0)
  const updatePosition = (event: MouseEvent) => {
    x.value = event.clientX
    y.value = event.clientY
  }
  onMounted(() => {
    document.addEventListener('click', updatePosition)
  })
  onUnmounted(() => {
    document.removeEventListener('click', updatePosition)
  })
  return { x, y }
}

export default useMouseTracker
vue3 这种实现方式的优点
- 第一:它可以清楚的知道 xy 这两个值的来源,这两个参数是干什么的,他们来自 useMouseTracker 的返回,那么它们就是用来追踪鼠标位置的值。
- 第二:我们可以xy 可以设置任何别名,这样就避免了命名冲突的风险。
- 第三:这段逻辑可以脱离组件存在,因为它本来就和组件的实现没有任何关系,我们不需要添加任何组件实现相应的功能。只有逻辑代码在里面,不需要模版。
# 模块化难度上升 - useURLLoader
// 安装 axios 注意它是自带 type 文件的,所以我们不需要给它另外安装 typescript 的定义文件
npm install axios --save
import { ref } from 'vue'
import axios from 'axios'
// 添加一个参数作为要使用的 地址
const useURLLoader = (url: string) => {
// 声明几个ref,代表不同的状态和结果
  const result = ref(null)
  const loading = ref(true)
  const loaded = ref(false)
  const error = ref(null)

// 发送异步请求,获得data
// 由于 axios 都有定义,所以rawData 可以轻松知道其类型
  axios.get(url).then((rawData) => {
    loading.value = false
    loaded.value = true
    result.value = rawData.data
  }).catch((e) => {
    error.value = e
  })
  // 将这些ref 一一返回
  return {
    result,
    loading,
    error,
    loaded
  }
}


export default useURLLoader
// 使用 urlLoader 展示狗狗图片
const { result, loading, loaded } = useURLLoader('https://dog.ceo/api/breeds/image/random')

...
<h1 v-if="loading">Loading!...</h1>
<img v-if="loaded" :src="result.message" >
# 模块化结合typescript - 泛型改造
// 为函数添加泛型
function useURLLoader<T>(url: string) {
  const result = ref<T | null>(null)
// 在应用中的使用,可以定义不同的数据类型
interface DogResult {
  message: string;
  status: string;
}
interface CatResult {
  id: string;
  url: string;
  width: number;
  height: number;
}

// 免费猫图片的 API  https://api.thecatapi.com/v1/images/search?limit=1
const { result, loading, loaded } = useURLLoader<CatResult[]>('https://api.thecatapi.com/v1/images/search?limit=1')
# 使用 defineComponent 包裹组件
# Teleport - 瞬间移动 第一部分
<template>
// vue3 新添加了一个默认的组件就叫 Teleport,我们可以拿过来直接使用,它上面有一个 to 的属性,它接受一个css query selector 作为参数,这就是代表要把这个组件渲染到哪个 dom 元素中
  <teleport to="#modal">
    <div id="center">
      <h1>this is a modal</h1>
    </div>
  </teleport>
</template>
<style>
  #center {
    width: 200px;
    height: 200px;
    border: 2px solid black;
    background: white;
    position: fixed;
    left: 50%;
    top: 50%;
    margin-left: -100px;
    margin-top: -100px;
  }
</style>
# Teleport - 瞬间移动 第二部分
Modal 组件
<template>
<teleport to="#modal">
  <div id="center" v-if="isOpen">
    <h2><slot>this is a modal</slot></h2>
    <button @click="buttonClick">Close</button>
  </div>
</teleport>
</template>
<script lang="ts">
import { defineComponent } from 'vue'
export default defineComponent({
  props: {
    isOpen: Boolean,
  },
  emits: {
    'close-modal': null
  },
  setup(props, context) {
    const buttonClick = () => {
      context.emit('close-modal')
    }
    return {
      buttonClick
    }
  }
})
</script>
<style>
  #center {
    width: 200px;
    height: 200px;
    border: 2px solid black;
    background: white;
    position: fixed;
    left: 50%;
    top: 50%;
    margin-left: -100px;
    margin-top: -100px;
  }
</style>
在 App 组件中使用
const modalIsOpen = ref(false)
const openModal = () => {
  modalIsOpen.value = true
}
const onModalClose = () => {
  modalIsOpen.value = false
}

<button @click="openModal">Open Modal</button><br/>
<modal :isOpen="modalIsOpen" @close-modal="onModalClose"> My Modal !!!!</modal>
# Suspense - 异步请求好帮手第一部分
定义一个异步组件,在 setup 返回一个 Promise,AsyncShow.vue
<template>
  <h1>{{result}}</h1>
</template>
<script lang="ts">
import { defineComponent } from 'vue'
export default defineComponent({
  setup() {
    return new Promise((resolve) => {
      setTimeout(() => {
        return resolve({
          result: 42
        })
      }, 3000)
    })
  }
})
</script>
在 App 中使用
<Suspense>
  <template #default>
    <async-show />
  </template>
  <template #fallback>
    <h1>Loading !...</h1>
  </template>
</Suspense>
# Suspense - 异步请求好帮手第二部分
使用 async await 改造一下异步请求, 新建一个 DogShow.vue 组件
<template>
  <img :src="result && result.message">
</template>

<script lang="ts">
import axios from 'axios'
import { defineComponent } from 'vue'
export default defineComponent({
  async setup() {
    const rawData = await axios.get('https://dog.ceo/api/breeds/image')
    return {
      result: rawData.data
    }
  }
})
</script>
Suspense 中可以添加多个异步组件
<Suspense>
  <template #default>
    <async-show />
    <dog-show />
  </template>
  <template #fallback>
    <h1>Loading !...</h1>
  </template>
</Suspense>
# Provide/Inject
在一个典型的 Vue 应用中,数据是通过 props 属性由上向下(由父及子)的进行传递的,这种特性称之为 Prop Drilling
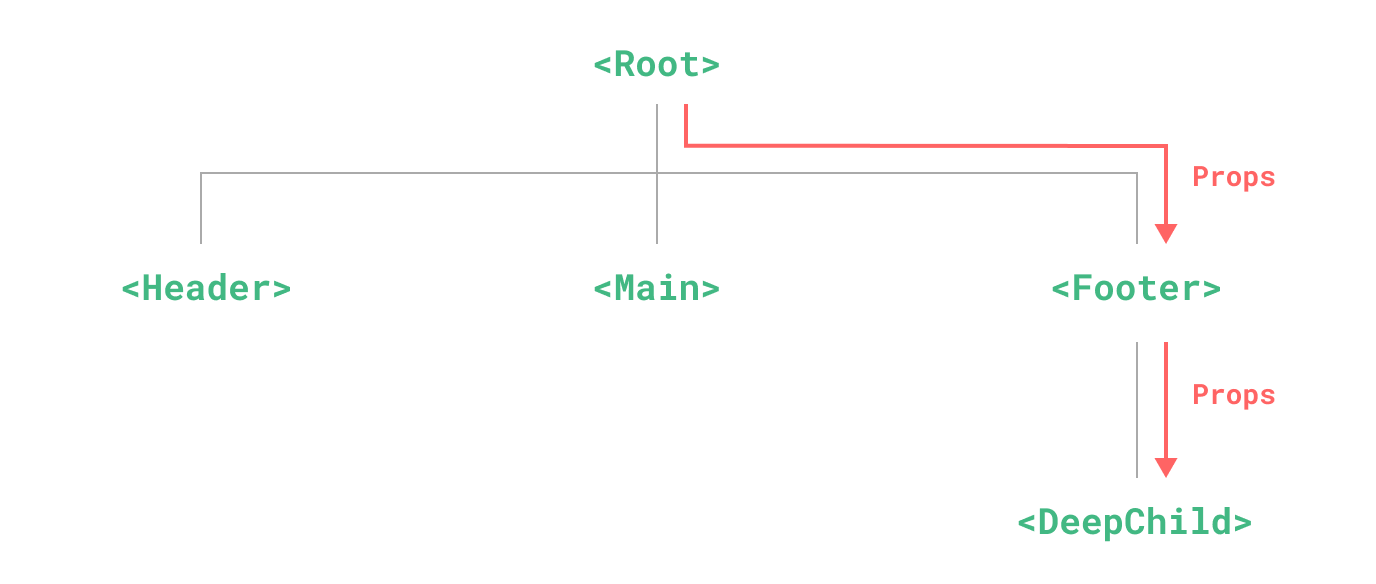
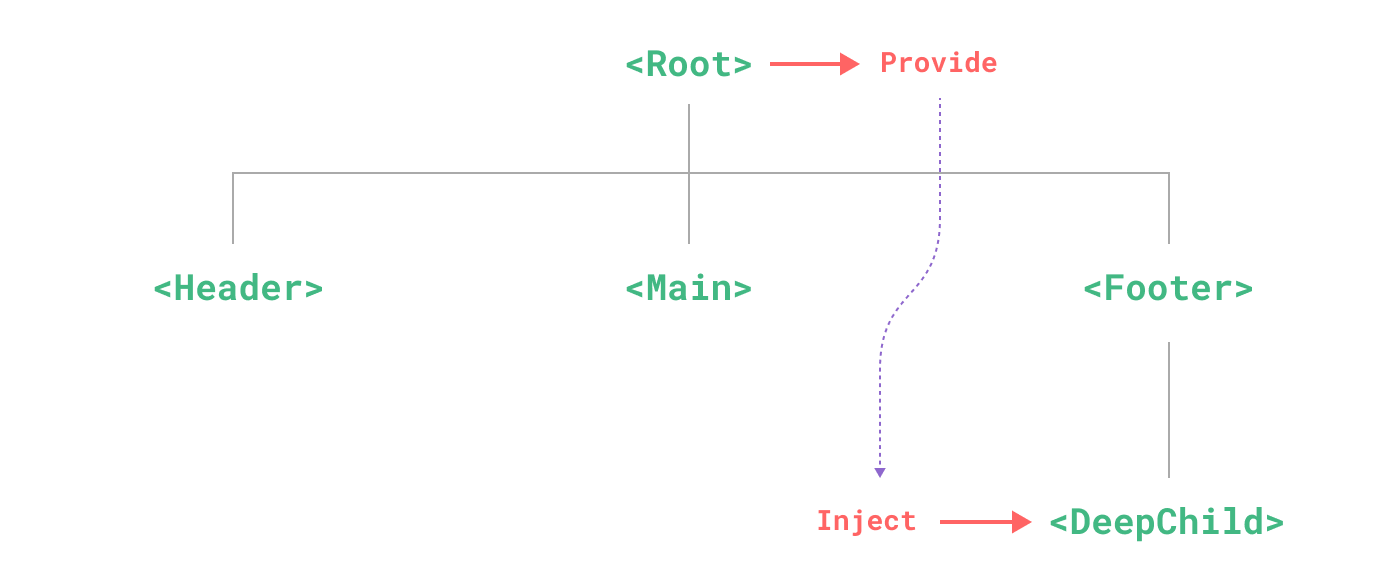
Provide/Inject 的推出就是为了解决这个问题的, 它提供了一种在组件之间共享此类值的方式,而不必通过组件树的每个层级显式地传递 props。
目的是为共享那些被认为对于一个组件树而言是“全局”的数据
文档地址:https://vuejs.org/guide/components/provide-inject.html
# 全局 API 修改
Vue2 的全局配置
import Vue from 'vue'
import App from './App.vue'

Vue.config.ignoredElements = [/^app-/]
Vue.use(/* ... */)
Vue.mixin(/* ... */)
Vue.component(/* ... */)
Vue.directive(/* ... */)

Vue.prototype.customProperty = () => {}

new Vue({
  render: h => h(App)
}).$mount('#app')
Vue2 这样写在一定程度上修改了 Vue 对象的全局状态。
- 第一,在单元测试中,全局配置非常容易污染全局环境,用户需要在每次 case 之间,保存和恢复配置。有一些 api (vue use vue mixin)甚至没有方法恢复配置,这就让一些插件的测试非常的困难。
- 第二,在不同的 APP 中,如果想共享一份有不同配置的 vue 对象,也变得非常困难。
Vue3 的修改
import { createApp } from 'vue'
import App from './App.vue'

const app = createApp(App)
// 这个时候 app 就是一个 App 的实例,现在再设置任何的配置是在不同的 app 实例上面的,不会像vue2 一样发生任何的冲突。

app.config.isCustomElement = tag => tag.startsWith('app-')
app.use(/* ... */)
app.mixin(/* ... */)
app.component(/* ... */)
app.directive(/* ... */)

app.config.globalProperties.customProperty = () => {}

// 当配置结束以后,我们再把 App 使用 mount 方法挂载到固定的 DOM 的节点上。
app.mount(App, '#app')
# Vue3 script setup 语法
确认版本:必须在 3.2 以上
是 composition API 的语法糖
文档地址:https://v3.cn.vuejs.org/api/sfc-script-setup.html
# 优点
- 更少的样板内容,更简洁的代码
- 能够使用纯 Typescript 声明 props 和抛出事件
- 更好的运行时性能
- 更好的 IDE 类型推断性能