# 第8章 通行凭证 - 权限管理
# 8-1 登录第一部分 获取token
代码提交详情:https://git.imooc.com/coding-449/zheye/commit/9d1623642c664693a08cdb460b43a1cb07a0618c
# 8-2 JWT 的运行机制
JWT 以及 Session 的运行原理图 
JWT 的官方网站,可以去试试看:https://jwt.io/
# 8-3 登录第二部分 axios 设置通用 header
Axios Default Header 设置的文档:https://axios-http.com/docs/config_defaults
// 示例代码
axios.defaults.baseURL = 'https://api.example.com';
axios.defaults.headers.common['Authorization'] = AUTH_TOKEN;
axios.defaults.headers.post['Content-Type'] = 'application/x-www-form-urlencoded';
代码提交详情:https://git.imooc.com/coding-449/zheye/commit/329405426a98a88b318291fb62b477c4757bd6a6
# 8-4 登录第三部分 持久化登录状态
LocalStorage 文档地址:https://developer.mozilla.org/en-US/docs/Web/API/Window/localStorage
注意这里为什么不选择 Cookie?
代码提交详情:https://git.imooc.com/coding-449/zheye/commit/d19af252da94f16f057c24e526c03f5ec29d1dca
# 8-5 通用错误处理
Axios 拦截器的文档地址:https://axios-http.com/docs/interceptors
示例代码:
// Add a request interceptor
axios.interceptors.request.use(function (config) {
    // Do something before request is sent
    return config;
  }, function (error) {
    // Do something with request error
    return Promise.reject(error);
  });

// Add a response interceptor
axios.interceptors.response.use(function (response) {
    // Any status code that lie within the range of 2xx cause this function to trigger
    // Do something with response data
    return response;
  }, function (error) {
    // Any status codes that falls outside the range of 2xx cause this function to trigger
    // Do something with response error
    return Promise.reject(error);
  });
代码提交详情: https://git.imooc.com/coding-449/zheye/commit/d55345cee5af5c80557650fa490974a2fd313824
# 8-6 创建 Message 组件 8-7 Message 组件改进为函数调用形式
代码提交详情:https://git.imooc.com/coding-449/zheye/commit/9d5e0af1f28271bbabcdda50a3897484df77712b
关于 Vue createApp 实例相关的文档地址:https://v3.cn.vuejs.org/api/application-api.html#component
# 8-8 了解 Vnode 以及 vue 的简单工作原理
文档地址:https://vuejs.org/guide/extras/rendering-mechanism.html#virtual-dom
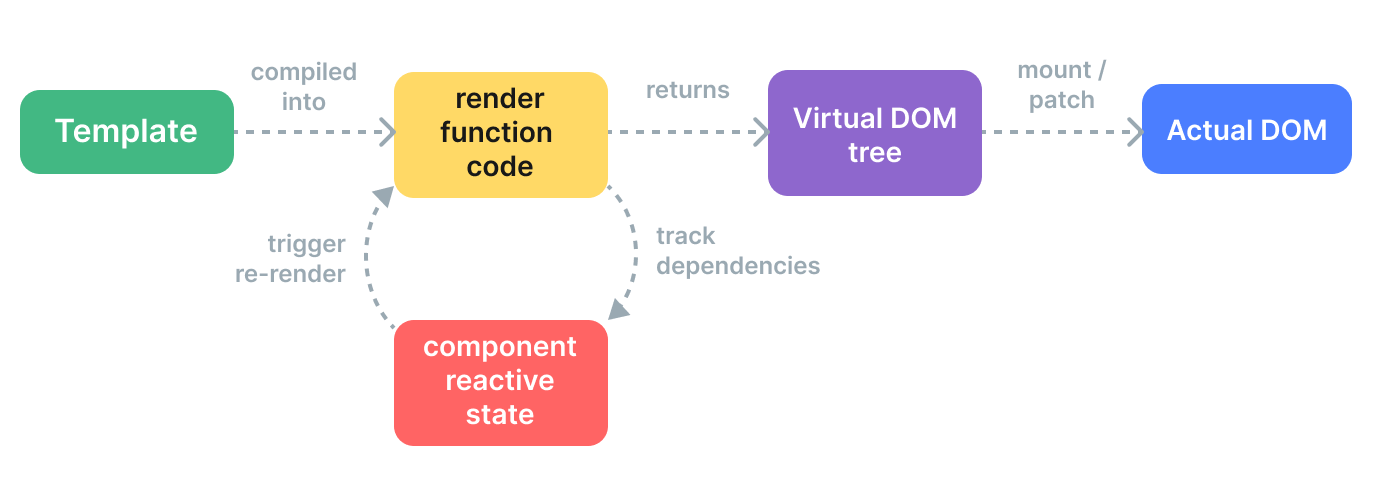
Virtual DOM:一种虚拟的,保存在内存中的数据结构,用来代表 UI 的表现,和真实 DOM 节点保持同步。Virtual DOM是由一系列的 Vnode 组成的。
// 模拟一个简单的 Vnode
const vnode = {
  type: 'div',
  props: {
    id: 'hello'
  },
  children: [
    /* more vnodes */
  ]
}
# Render Pipeline
- Compile, Vue 组件的 Template 会被编译成 render function,一个可以返回 Virtual DOM 树的函数。
- Mount,执行 render function,遍历虚拟DOM 树,生成真正的 DOM 节点。
- Patch,当组件中任何响应式对象(依赖)发生变化的时候,执行更新操作 。生成新的虚拟节点树,Vue 内部会遍历新的虚拟节点树,和旧的树做对比,然后执行必要的更新。

虚拟DOM 的优点
- 可以使用一种更方便的方式,供开发者操控 UI 的状态和结构,不必和真实的DOM 节点打交道。
- 更新效率更高,计算需要的最小化操作,并完成更新。
# 看一下 Render Functions
// 在 main.ts 中
console.log(App)
// 返回
Object
  components: {HelloWorld: {…}}
  name: "App"
  render: ƒ render(_ctx, _cache, $props, $setup, $data, $options)
  setup: ƒ ()
// 原始的 template
<template>
  <HelloWorld msg="axyz"/>
  {{ hello }}
</template>

// template 会被转换成这样的 function
  const _component_HelloWorld = _resolveComponent("HelloWorld")!

  return (_openBlock(), _createElementBlock(_Fragment, null, [
    _createVNode(_component_HelloWorld, { msg: "axyz" }),
    _createTextVNode(" " + _toDisplayString(_ctx.hello), 1 /* TEXT */)
  ], 64 /* STABLE_FRAGMENT */))
- Template 比 render function 更接近 html,更好懂,更容易修改。
- Template 更容易做静态优化,Vue 的 compiler 在编译过程中可以做很多自动的性能优化。
在实践中,templates适应大多数的情况,但是在少数情况下,还是需要学习使用 render function。因为它本身是 javascript 语法,要更灵活多变。Vue 提供对应的 API 可以不使用 templates,而是直接使用 render function。
# 8-9 创建 Vnode 以及使用 render function
# 创建 Vnode
h 和 createVnode 都可以创建 vnode,h 是 hyperscript 的缩写,意思就是 “JavaScript that produces HTML (hypertext markup language)”,很多 virtualDOM 的实现都使用这个函数名称。还有一个函数称之为 createVnode,更形象,两个函数的用法几乎是一样的。
import { h, createVnode } from 'vue'

const vnode = h(
  'div', // type
  { id: 'foo', class: 'bar' }, // props
  [
    /* children */
  ]
)
# 声明 Render Function
当使用 composition API 的时候,在 setup 当中直接返回一个对象,代表着给模版使用的数据,当要使用 render function 的时候,可以直接返回一个函数。
setup() {
  const message = ref(1)
  // 使用 template
  return {
    message
  }
  // 使用 render function
  return () => {
    return h('div')
  }
}
使用 JSX
JSX 是一种类似XML 的语法,如果大家使用过 React 对它应该特别熟悉。它就是 h 函数的一种语法糖。可以将这种类似 HTML 的语法转换成 h 函数的写法。
// 创建 vnode
const vnode = <div>hello</div>
// 使用变量
const vnode = <div id={dynamicId}>hello, {userName}</div>
添加 JSX 支持
vue add babel